Salted Caramel Oreo Icebox Cake
Table of Contents
- What Is an Icebox Cake?
- Why Salted Caramel and Oreo Work So Well Together
- Ingredients You Will Need
- Step By Step Instructions
- Tips for the Perfect Icebox Cake
- Flavor Variations
- Best Occasions for This Dessert
- Best Drinks to Pair With It
- Common Mistakes to Avoid
- How to Store Salted Caramel Oreo Icebox Cake
- Final Thoughts


Salted Caramel Oreo Icebox Cake
- Adam Smith
- 08-31-2024
- 05-08-2026
- 2349 views
- Coffee Recipes
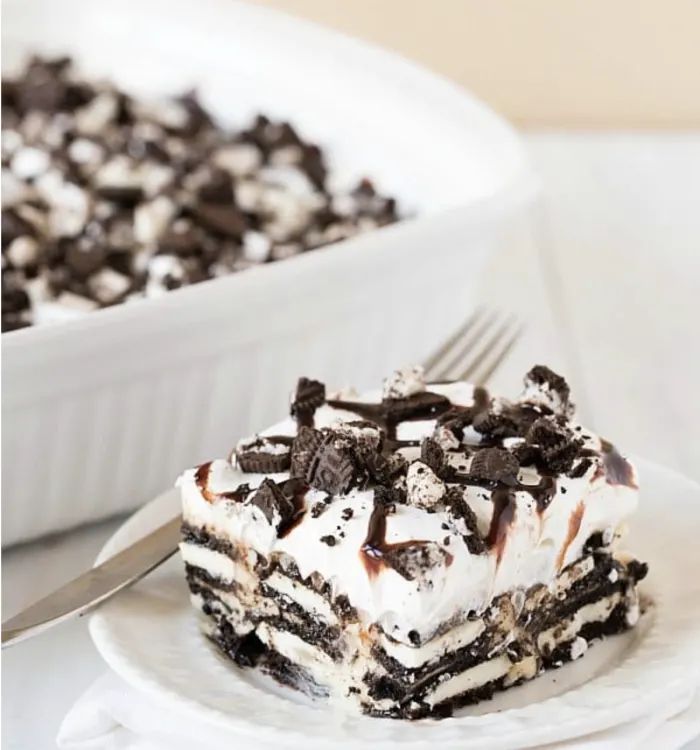
Salted caramel Oreo icebox cake is the ultimate no bake dessert for anyone who loves rich chocolate, creamy layers, and sweet salty flavor combinations. With soft Oreo cookies, silky whipped filling, buttery caramel, and a touch of sea salt, this chilled dessert delivers bakery style indulgence with almost no effort.
As the cake rests in the refrigerator, the Oreo layers soften into a smooth cake like texture while the caramel and cream blend into a rich and luxurious filling. The result is cold, creamy, chocolatey, and deeply satisfying.
Perfect for parties, holidays, summer gatherings, or weekend desserts, this icebox cake is both easy to make and impressive to serve.
What Is an Icebox Cake?
An icebox cake is a no bake layered dessert made by stacking cookies or crackers with whipped cream or pudding filling. After chilling for several hours, the layers soften and develop a texture similar to cake.
This version combines:
- Oreo cookies
- Salted caramel sauce
- Whipped cream filling
- Cream cheese richness
- Chilled layered texture
The dessert becomes creamy, soft, and perfectly sliceable after refrigeration.
Why Salted Caramel and Oreo Work So Well Together
Oreo cookies provide deep chocolate flavor while salted caramel adds buttery sweetness and slight savory contrast.
Together they create:
- Sweet and salty balance
- Rich chocolate depth
- Smooth creamy texture
- Crunchy to soft transformation
- Decadent layered flavor
The sea salt also helps balance the sweetness and intensify the caramel flavor.
Ingredients You Will Need
Main Ingredients
- 1 package Oreo cookies
- 8 ounces cream cheese softened
- 1/2 cup powdered sugar
- 2 cups heavy cream
- 1 teaspoon vanilla extract
- 1 cup salted caramel sauce
Optional Toppings
- Crushed Oreos
- Extra caramel drizzle
- Sea salt flakes
- Chocolate shavings
Step By Step Instructions
Step 1: Prepare the Cream Filling
In a bowl, beat cream cheese and powdered sugar until smooth.
Add vanilla extract and mix well.
Step 2: Whip the Cream
In another bowl, whip heavy cream until soft peaks form.
Step 3: Combine the Mixtures
Fold whipped cream gently into the cream cheese mixture until light and fluffy.
Step 4: Create the First Layer
Arrange Oreo cookies in a single layer at the bottom of a serving dish.
Step 5: Add Cream and Caramel
Spread part of the cream filling over the Oreo layer.
Drizzle salted caramel sauce evenly on top.
Step 6: Repeat the Layers
Continue layering Oreos, cream filling, and caramel until all ingredients are used.
Finish with cream on top.
Step 7: Decorate
Top with crushed Oreos, caramel drizzle, chocolate shavings, and a light sprinkle of sea salt.
Step 8: Chill Overnight
Refrigerate for at least 6 hours or overnight.
The cookies will soften into a cake like texture.
Tips for the Perfect Icebox Cake
Chill Long Enough
Overnight chilling creates the best texture and flavor blending.
Use Cold Heavy Cream
Cold cream whips faster and holds structure better.
Fold Gently
Gentle folding keeps the filling light and airy.
Balance the Salt Carefully
Too much salt can overpower the caramel sweetness.
Flavor Variations
This dessert can easily be customized.
Chocolate Salted Caramel Icebox Cake
Add chocolate pudding between layers.
Peanut Butter Oreo Version
Spread peanut butter between Oreo layers.
Mocha Caramel Icebox Cake
Add espresso powder into the filling.
Nutty Caramel Cake
Mix chopped pecans or almonds into the layers.
Best Occasions for This Dessert
Salted caramel Oreo icebox cake works perfectly for:
- Summer desserts
- Birthday parties
- Holiday gatherings
- Potlucks
- Family celebrations
Its no bake simplicity makes it especially convenient for entertaining.
Best Drinks to Pair With It
This rich dessert pairs beautifully with:
- Coffee
- Cold milk
- Cappuccino
- Hot chocolate
- Caramel latte
Coffee based drinks especially balance the sweetness well.
Common Mistakes to Avoid
Not Chilling Long Enough
The cookies need time to soften properly.
Overwhipping the Cream
Overwhipped cream creates grainy texture.
Too Much Caramel
Excess caramel can make layers slippery and overly sweet.
Uneven Layers
Balanced layers improve texture and presentation.
How to Store Salted Caramel Oreo Icebox Cake
Store covered in the refrigerator for up to 4 days.
Serve chilled directly from the refrigerator for the best texture.
Freezing is possible, although the texture may soften slightly after thawing.
Final Thoughts
Salted caramel Oreo icebox cake is the perfect combination of creamy texture, chocolate richness, and buttery caramel flavor. The soft Oreo layers, fluffy filling, and sweet salty balance create a dessert that feels indulgent, comforting, and incredibly satisfying.
Whether served at celebrations or enjoyed casually at home, this no bake dessert delivers impressive flavor and luxurious texture with minimal effort.


Deal of Day
Shop
Visit Our Store!
Discover products inspired by our blog — click here to explore the store.
Visit NowEvents

Events-Coffee Culture Live
Don’t miss out on exclusive coffee events and community gatherings.
Coming Soon
Jobs


Subscribe now
Subscribe to our newsletter today for a chance to win a FREE one year coffee subscription after your first order!