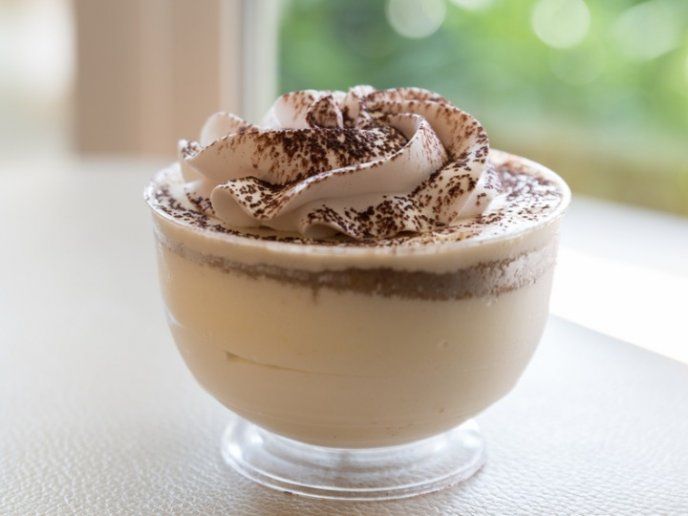
No-Bake Coffee Mousse Cake for Easy Entertaining
Table of Contents
- What Is a No Bake Coffee Mousse Cake?
- Why This Dessert Is Perfect for Entertaining
- Ingredients You Will Need
- Step By Step Instructions
- Tips for the Perfect Coffee Mousse Cake
- Flavor Variations
- Best Occasions for This Dessert
- Best Drinks to Pair With It
- Common Mistakes to Avoid
- How to Store Coffee Mousse Cake
- Final Thoughts


No-Bake Coffee Mousse Cake for Easy Entertaining
- Adam Smith
- 12-14-2024
- 05-08-2026
- 1385 views
- Coffee Recipes
When you need a dessert that looks elegant, tastes luxurious, and requires minimal effort, a no bake coffee mousse cake is the perfect solution. Light, creamy, and packed with rich coffee flavor, this chilled dessert combines silky coffee mousse with soft biscuit layers for a café style treat that feels both refreshing and indulgent.
Because it requires no oven, this dessert is ideal for warm weather, dinner parties, family gatherings, or last minute entertaining. It delivers the sophisticated flavor of a premium coffeehouse dessert without the stress of complicated baking techniques.
Smooth texture, bold coffee aroma, and creamy sweetness make this mousse cake a guaranteed crowd favorite.
What Is a No Bake Coffee Mousse Cake?
A no bake coffee mousse cake is a chilled layered dessert made with coffee flavored mousse and a soft crust or biscuit base. Instead of baking, the dessert sets in the refrigerator until firm and sliceable.
It usually includes:
- Coffee infused mousse
- Whipped cream or cream cheese
- Crushed biscuit base
- Espresso or coffee flavoring
- Chocolate or cocoa garnish
The final texture is airy, creamy, and melt in your mouth smooth.
Why This Dessert Is Perfect for Entertaining
This dessert works especially well for gatherings because it can be prepared ahead of time and stored in the refrigerator until serving.
Benefits include:
- No oven required
- Easy preparation
- Elegant presentation
- Make ahead convenience
- Light yet rich texture
It also slices beautifully, making it ideal for serving guests.
Ingredients You Will Need
For the Base
- 2 cups crushed biscuits or graham crackers
- 1/2 cup melted butter
- 1 tablespoon sugar optional
For the Coffee Mousse
- 2 cups heavy cream
- 8 ounces cream cheese softened
- 1/2 cup powdered sugar
- 2 tablespoons instant espresso powder
- 2 tablespoons warm water
- 1 teaspoon vanilla extract
For Topping
- Cocoa powder
- Chocolate shavings
- Whipped cream
- Coffee beans optional
Step By Step Instructions
Step 1: Prepare the Crust
Mix crushed biscuits with melted butter until evenly combined.
Press the mixture firmly into the bottom of a springform pan or serving dish.
Refrigerate while preparing the mousse.
Step 2: Dissolve the Espresso
Mix espresso powder with warm water until fully dissolved.
Allow it to cool slightly.
Step 3: Make the Cream Base
In a bowl, beat cream cheese and powdered sugar until smooth and creamy.
Add vanilla extract and espresso mixture.
Step 4: Whip the Cream
In a separate bowl, whip heavy cream until soft peaks form.
Step 5: Combine the Mousse
Fold the whipped cream gently into the coffee cream cheese mixture.
Mix slowly to maintain light and airy texture.
Step 6: Assemble the Cake
Spread the coffee mousse evenly over the chilled crust.
Smooth the top using a spatula.
Step 7: Chill Until Set
Refrigerate for at least 6 hours or overnight.
The mousse should become firm enough to slice cleanly.
Step 8: Decorate Before Serving
Dust cocoa powder on top and garnish with chocolate shavings or whipped cream.
Serve chilled.
Tips for the Perfect Coffee Mousse Cake
Use Strong Coffee Flavor
Coffee flavor becomes milder after chilling, so stronger espresso gives better balance.
Chill Overnight
Longer chilling improves texture and flavor development.
Fold Gently
Aggressive mixing removes air from the mousse and creates heaviness.
Use Full Fat Cream Cheese
Full fat cream cheese creates richer and smoother texture.
Flavor Variations
This dessert can easily be customized.
Mocha Mousse Cake
Add cocoa powder or melted chocolate for mocha flavor.
Caramel Coffee Mousse Cake
Drizzle caramel sauce between layers.
Hazelnut Coffee Cake
Mix hazelnut spread into the mousse.
Tiramisu Inspired Version
Add coffee soaked ladyfingers between layers.
Best Occasions for This Dessert
A no bake coffee mousse cake works perfectly for:
- Dinner parties
- Summer gatherings
- Holiday desserts
- Birthday celebrations
- Weekend treats
Its elegant appearance makes it feel impressive despite simple preparation.
Best Drinks to Pair With It
This dessert pairs beautifully with:
- Espresso
- Cappuccino
- Cold brew coffee
- Hot chocolate
- Vanilla latte
Coffee based drinks naturally enhance the mousse flavor.
Common Mistakes to Avoid
Not Chilling Long Enough
Insufficient chilling prevents the cake from setting properly.
Overwhipping the Cream
Overwhipped cream creates grainy mousse texture.
Weak Coffee Mixture
Weak coffee reduces the dessert’s signature flavor.
Using Warm Espresso
Hot espresso can affect mousse consistency.
How to Store Coffee Mousse Cake
Store covered in the refrigerator for up to 4 days.
The cake can also be frozen for longer storage, although texture may soften slightly after thawing.
Final Thoughts
A no bake coffee mousse cake is the ultimate easy entertaining dessert for coffee lovers who want something elegant, creamy, and deeply flavorful without complicated baking. The smooth coffee mousse, buttery crust, and rich café aroma create a luxurious dessert experience that feels both light and indulgent.
Perfect for celebrations or casual gatherings, this chilled dessert delivers coffeehouse quality flavor with minimal effort and maximum satisfaction.


Deal of Day
Shop
Visit Our Store!
Discover products inspired by our blog — click here to explore the store.
Visit NowEvents

Events-Coffee Culture Live
Don’t miss out on exclusive coffee events and community gatherings.
Coming Soon
Jobs


Subscribe now
Subscribe to our newsletter today for a chance to win a FREE one year coffee subscription after your first order!