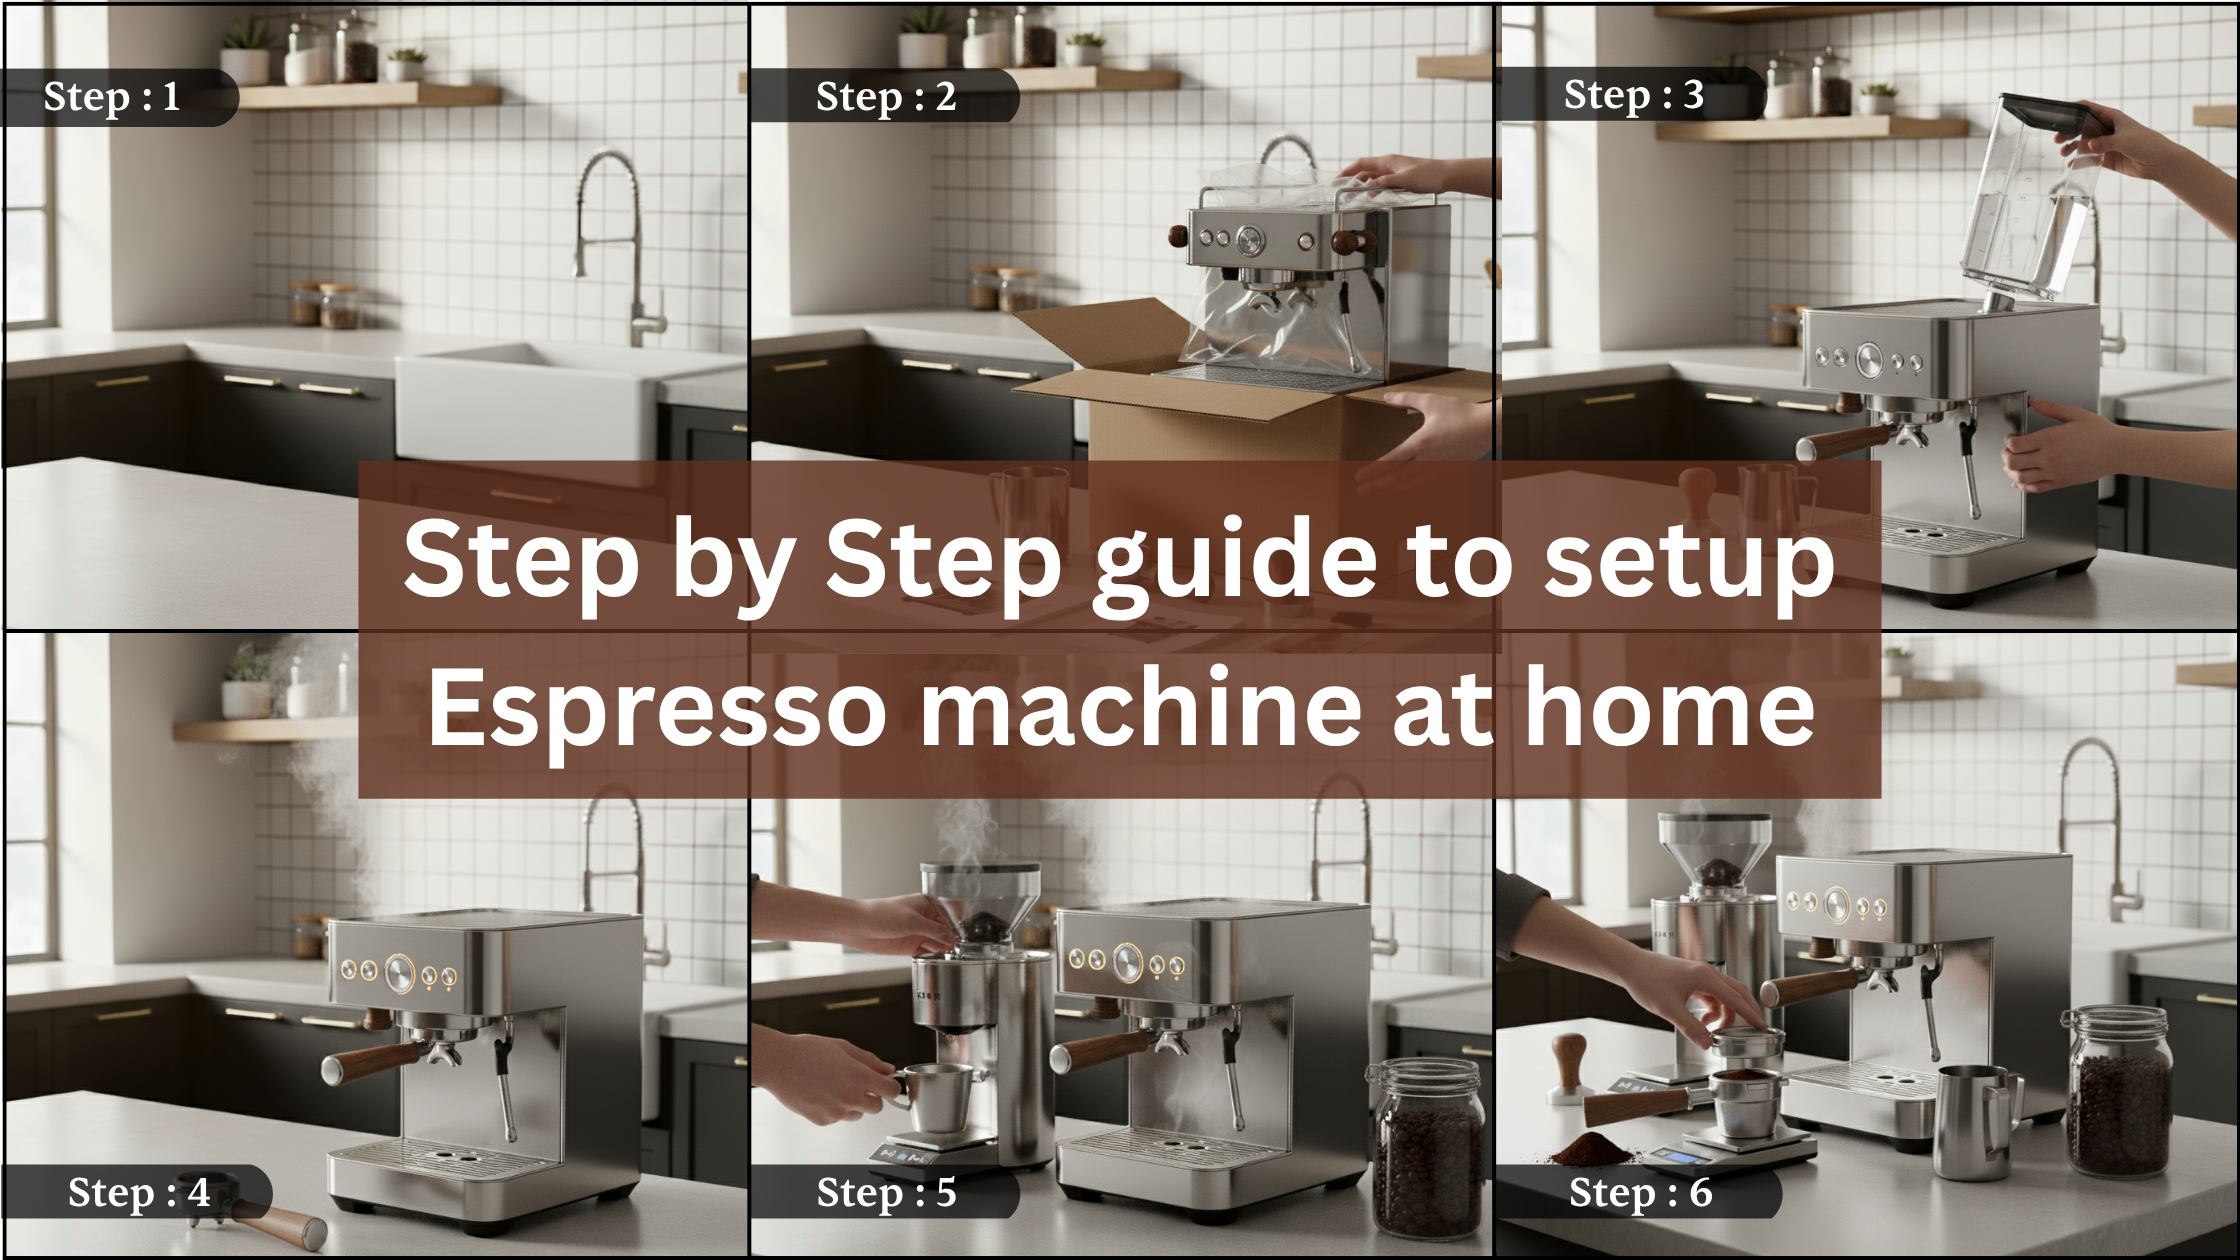
7 Simple Steps for Espresso Machine Setup in Your Kitchen


7 Simple Steps for Espresso Machine Setup in Your Kitchen
- azeem memon
- 10-24-2025
- 04-29-2026
- 1274 views
- Coffee Machine, How To's
A home espresso setup doesn’t fail because of the machine. It fails because of poor setup and inconsistency. If you get the fundamentals right from day one, everything else becomes easier to control.
Here’s a clean, no-nonsense setup process.
1. Choose the right location
This is not just about space. It’s about workflow and stability.
Place your machine:
- Near a power source
- Close to a water source
- On a flat, vibration-free surface
Avoid cramped corners. You need room to move, grind, tamp, and clean.
2. Use proper water
Water quality directly affects taste and machine lifespan.
What to use:
- Filtered water
- Low to moderate mineral content
What to avoid:
- Distilled water (no minerals, poor extraction)
- Hard tap water (causes scaling)
Bad water ruins both flavor and equipment over time.
3. Set up your grinder first
Espresso is grind-sensitive. Your machine cannot fix a bad grind.
Requirements:
- Burr grinder, not blade
- Fine, consistent grind
Dial it in:
- Too coarse → weak, fast shots
- Too fine → slow, bitter shots
This is the most important variable.
4. Preheat everything
Temperature consistency is critical.
Before brewing:
- Turn on the machine and let it heat fully
- Run water through the group head
- Warm your portafilter and cup
Cold equipment leads to poor extraction and flat taste.
5. Dose and tamp correctly
Consistency here determines shot quality.
Steps:
- Measure your coffee dose (typically 18 to 20g for double shot)
- Distribute evenly
- Tamp with firm, level pressure
Mistakes:
- Uneven tamp → channeling
- Inconsistent dose → unpredictable shots
Precision matters.
6. Dial in your espresso shot
This is where you refine the result.
Target:
- Extraction time around 25 to 30 seconds
- Balanced flow, not too fast or slow
Adjust using grind size:
- Faster than 20 seconds → grind finer
- Slower than 35 seconds → grind coarser
You are tuning resistance and flow.
7. Clean immediately after use
Most beginners ignore this and degrade their setup quickly.
After each session:
- Flush the group head
- Rinse portafilter
- Wipe steam wand
Daily or weekly:
- Backflush if your machine supports it
- Deep clean periodically
Clean equipment = consistent taste.
What actually determines success
Your espresso quality depends on:
- Grind consistency
- Water quality
- Temperature stability
- Repeatable technique
Not the price of your machine.
Common setup mistakes
Skipping grinder quality
A cheap grinder ruins even expensive machines
Ignoring water
Scaling and poor taste follow quickly
Inconsistent dosing
Leads to random results
Rushing the process
Espresso requires control, not speed
Final thoughts
Setting up an espresso machine is not complicated, but it requires discipline.
If you control:
- Grind
- Dose
- Temperature
- Timing
You get consistent, high-quality espresso.
If you ignore these, no machine will save you.
Get the setup right once, and everything else becomes refinement instead of frustration.


Deal of Day


Shop
Visit Our Store!
Discover products inspired by our blog — click here to explore the store.
Visit NowEvents

Events-Coffee Culture Live
Don’t miss out on exclusive coffee events and community gatherings.
Coming Soon
Jobs


Subscribe now
Subscribe to our newsletter today for a chance to win a FREE one year coffee subscription after your first order!